My final project for the Victorian Christmas Tea (see my
previous post for the other projects) were Tea Cup Stands - each lady attending the Christmas Tea brought a tea cup as part of an exchange. We needed a way to display the multitude of tea cups that also fit with our theme and decor. Having seen the very popular cupcake stands all over the internet, I decided to make my version which needed to be sturdy, fairly inexpensive and easy.
I did not want to mess with power tools, cutting large pieces of wood or long steel poles. No drilling holes or installing brackets. I got very tired of the glazed eyes, the confusing and contradictory pieces of information I received from the "helpful" guys at Lowes. I simply asked for advice regarding securing PVC pipes to wood. Once I mentioned they were for making tea cup stands, the guys got nervous or confused. The man in the lumber department was the most helpful, eventually pointing me to the precut wood circles after discussing various wood grades and showing me large pieces of lumber. He sent me to the hardware guy who was less helpful with a strange bracket solution that even I knew could not work on a circular object. The least helpful was the plumbing guy who led me to 6 foot long steel pipes which I would have to cut myself and had no answers to how I would keep the wood in place after drilling holes in all of them (his suggestion in the first place!) He quickly stated that he didn't have anything that could possibly help me and disappeared. I left the store thinking they needed more women working in their store!

So I took these wood circles, four of the 15" and four of the 18", picked out eight wide PVC pipes and headed to the paint department. I picked up a can of satin white paint, not wanting to deal with the fumes of spray paint though it was the same brand. A tube of gorilla glue, and I had everything to start the project.
I painted the circles with two coats of the white paint, then hot glued ribbon around each PVC pipe, which sufficiently covered the stamped markings on each.
Once the paint was dry, I brought the circles to a craft day at the church and showed the ladies how to decoupage decorative scrapbook papers in various patterns on the top of each circle.


Once the wood circles were dry from several coats of the decoupage paste, I hot glued trim around each one. I purchased the trim from the fabric department at Walmart and chose two of the most reasonably priced, considering I needed around six yards each for a total of twelve to cover all of the circles.

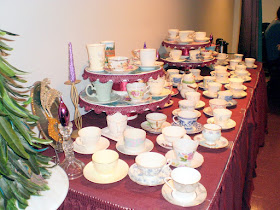
The final step was gluing the PVC pipes to the center of the wood circles, one to the bottom of the large circle to raise it up and one in between the large and smaller circle to create the two tier stand. For me, finding the center of each circle and gluing the PVC pipes was the most challenging step. The perfectionist in me was determined to find the EXACT center and fretted about the possibility of the stands being off-balance. A man from the church gifted with construction and who had the right tools for measurement preserved my sanity by taking over this task. And now for the unveiling of the stands, being used on the day of the Christmas Tea:


The cost breakdown for this project:
The 15" circle - $6.68 each
The 18" circle - $9.76 each
The PVC pipes - $2.00 each
The trim - approx. $5.00 for each stand
These supplies total $23.44 per stand.
The additional supplies (which you may or may not have on hand) include paint, scrapbook papers, decoupage paste, gorilla glue, hot glue and ribbon. For our project, I purchased white paint and gorilla glue. The other supplies came from either my craft supply stash or from one of the ladies on craft day. I was extremely pleased at how these stands turned out, and they are an inexpensive option compared to other stands being sold. For a cupcake stand, you wouldn't need as thick a piece of wood and could add more tiers of varying degrees of width. If you borrow this idea, please link back to this post and give me credit!!! I would also love to see your project outcome!
![[6726.jpg]](https://blogger.googleusercontent.com/img/b/R29vZ2xl/AVvXsEiEgm_7DSyIYoi5K2biu0KiPE5JtQvukZOJGQHfu9e7WHJZvXU00BlvfHziUPN5DVfWyw260KgZhSX4f2iELgJprjc3KRzAtZmMHIrwVsTrtC8wHQWHf2j6GgCR1IDrPaCtZs1lHkUpvk3W/s280/6726.jpg) I came across these images that I took this summer while visiting my parents. In the middle of dinner, the sky suddenly turned dark and stormy. After a brief deluge of summer rain, the skies cleared and made way for a gorgeous sunset. I’ve spent many moments throughout the years looking out onto the water scene pictured above, pondering life and what the future would hold. My beloved proposed a decade ago, as a matter of fact, while we were seated on a swing looking at this view.
I came across these images that I took this summer while visiting my parents. In the middle of dinner, the sky suddenly turned dark and stormy. After a brief deluge of summer rain, the skies cleared and made way for a gorgeous sunset. I’ve spent many moments throughout the years looking out onto the water scene pictured above, pondering life and what the future would hold. My beloved proposed a decade ago, as a matter of fact, while we were seated on a swing looking at this view.![[6711.jpg]](https://blogger.googleusercontent.com/img/b/R29vZ2xl/AVvXsEgBS_CaNE0veS2uQWG2fz0J8slyU-36kONcy2lIi2la00X7X5eWydwKr3fWqdsPeHZytu8AKDR-3YMQIm23JFcOnEMhyphenhyphenocPzrf4i4cYD-tIzyHnMcDaBoMWTX9WDp7UY9hFqvjFSaOKLPlG/s280/6711.jpg)


